

Next.js File and Folder Structure
In this blog, we will understand what are the files and folders and what is their meaning when we create a new Next.js application.

Self-taught Developer with over 2 years of experience in developing websites. I want to help clients build websites with technologies like 𝗥𝗲𝗮𝗰𝘁.𝗷𝘀, 𝗡𝗲𝘅𝘁.𝗷𝘀, 𝗮𝗻𝗱 𝗧𝗮𝗶𝗹𝘄𝗶𝗻𝗱𝗖𝗦𝗦 to make their websites fast, and UX-friendly. I also love teaching the things I learn, so I also blog my learnings in a way for people with little knowledge to consume.
Web-Developer: Made over 𝟱+ 𝗽𝗿𝗼𝗷𝗲𝗰𝘁𝘀 on web development with a range of technologies including Reactjs, Nextjs, TailwindCSS, Bootstrap, Redux, ContextAPI, etc.
I believe in Learning by building and so I love applying what I learned to help clients build premium websites with the latest technologies to give their end-users the best experience possible. Additionally, I also love watching anime and playing online video games.
Feel free to connect with me: Email: jhaladevrajsinh11@gmail.com
Hello everyone, welcome to the first blog of this amazing series. First we will look at how to install and create a new next.js app and then will understand the files that are there in the package. Then we will understand the different conventions of naming the files and what they represent.
Installing and creating a new Next.js App:
- Open your terminal in your desired location and type the following command:
npm i -g create-next-app
- Now type the following command in the terminal to initialize Next.js app:
npx create-next-app <project_name>
Now select the following options according to below image. You can customize as you want but for beginners I suggest to stick with the same as I will be following this convention throughout this series.

After this just wait for the magic to happen and you will have your Next.js app ready within some time.
Understanding the file and folder structure
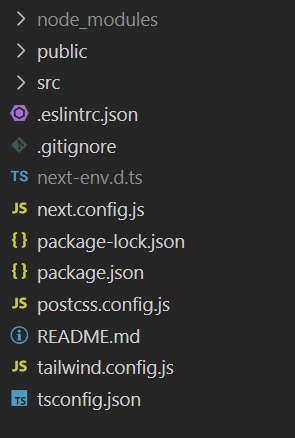
Let's understand the files and folders by elimination. First let's understand the files:
tsconfig.json: This file as the name suggest denotes the configuration of the typescript. If you have not selected TypeScript in first option of initialization, you will not get this file.
tailwind.config.js and postcss.config.js: This file as the name suggest denotes the configuration of the Tailwind CSS throughout the project. If you have not selected Tailwind CSS then you will not get this file.
README.md: Markdown file for writing documentation of your project
next-env.d.ts: This is again a file related to typescript and does not have a major role at least in the beginning. If you have not selected TypeScript, this won't even appear.
Now that you have a high level understanding of what these files are, let's understand the folders as well:
public folder:

As we can see, public folder does not have many files just 2 SVGs of Next and Vercel. You can use this folder to store the assets related to your folder. But if you notice in React's public folder, we had index.html file, but here we don't because Next.js 13 by default prepares every page on the server.
src folder:

The src folder by default contains only one folder and that is app folder. You can create many folders inside src folder such as components, containers, etc. But don't create any folder inside the app folder otherwise it will act as a route (We will explore this in further blogs).
Now let's understand the files inside the app folder one-by-one. Even if you don't understand here, Don't worry I will explore each of these file names like page, layout and many more in a detailed blog further. For now just try to understand what does these represent.
favicon.ico: As we all know, favicon is nothing but just the icon besides your Website Name in the tabs. By replacing this favicon.ico with your own customized favicon.ico you can change the default favicon.
globals.css: As the name suggest, this file can be used to declare CSS globally (throughout the entire project).
layout.tsx:
import './globals.css'

import { Inter } from 'next/font/google'

const inter = Inter({ subsets: ['latin'] })

export const metadata = {

  title: 'Create Next App',

  description: 'Generated by create next app',

}

export default function RootLayout({

  children,

}: {

  children: React.ReactNode

}) {

  return (

    <html lang="en">

      <body className={inter.className}>{children}</body>

    </html>

  )

}
layout.tsx file is used to set the layout of your web app. That means if you have created a Navbar and imported here, it will be featured in every page you have created. Also lets say you have set the max width of every page to be 1000 px, then every page will have a max width of 1000 px.
    <html lang="en">

      <body className={inter.className}>
      <Navbar />
      {children}
      </body>

    </html>
- page.tsx:
import Image from 'next/image'
export default function Home() {
return (
<main className="flex min-h-screen flex-col items-center justify-between p-24">
<div className="z-10 w-full max-w-5xl items-center justify-between font-mono text-sm lg:flex">
<p className="fixed left-0 top-0 flex w-full justify-center border-b border-gray-300 bg-gradient-to-b from-zinc-200 pb-6 pt-8 backdrop-blur-2xl dark:border-neutral-800 dark:bg-zinc-800/30 dark:from-inherit lg:static lg:w-auto lg:rounded-xl lg:border lg:bg-gray-200 lg:p-4 lg:dark:bg-zinc-800/30">
Get started by editing
<code className="font-mono font-bold">src/app/page.tsx</code>
</p>
<div className="fixed bottom-0 left-0 flex h-48 w-full items-end justify-center bg-gradient-to-t from-white via-white dark:from-black dark:via-black lg:static lg:h-auto lg:w-auto lg:bg-none">
<a
className="pointer-events-none flex place-items-center gap-2 p-8 lg:pointer-events-auto lg:p-0"
href="https://vercel.com?utm_source=create-next-app&utm_medium=appdir-template&utm_campaign=create-next-app"
target="_blank"
rel="noopener noreferrer"
>
By{' '}
<Image
src="/vercel.svg"
alt="Vercel Logo"
className="dark:invert"
width={100}
height={24}
priority
/>
</a>
</div>
</div>
<div className="relative flex place-items-center before:absolute before:h-[300px] before:w-[480px] before:-translate-x-1/2 before:rounded-full before:bg-gradient-radial before:from-white before:to-transparent before:blur-2xl before:content-[''] after:absolute after:-z-20 after:h-[180px] after:w-[240px] after:translate-x-1/3 after:bg-gradient-conic after:from-sky-200 after:via-blue-200 after:blur-2xl after:content-[''] before:dark:bg-gradient-to-br before:dark:from-transparent before:dark:to-blue-700 before:dark:opacity-10 after:dark:from-sky-900 after:dark:via-[#0141ff] after:dark:opacity-40 before:lg:h-[360px]">
<Image
className="relative dark:drop-shadow-[0_0_0.3rem_#ffffff70] dark:invert"
src="/next.svg"
alt="Next.js Logo"
width={180}
height={37}
priority
/>
</div>
<div className="mb-32 grid text-center lg:mb-0 lg:grid-cols-4 lg:text-left">
<a
href="https://nextjs.org/docs?utm_source=create-next-app&utm_medium=appdir-template&utm_campaign=create-next-app"
className="group rounded-lg border border-transparent px-5 py-4 transition-colors hover:border-gray-300 hover:bg-gray-100 hover:dark:border-neutral-700 hover:dark:bg-neutral-800/30"
target="_blank"
rel="noopener noreferrer"
>
<h2 className={`mb-3 text-2xl font-semibold`}>
Docs{' '}
<span className="inline-block transition-transform group-hover:translate-x-1 motion-reduce:transform-none">
->
</span>
</h2>
<p className={`m-0 max-w-[30ch] text-sm opacity-50`}>
Find in-depth information about Next.js features and API.
</p>
</a>
<a
href="https://nextjs.org/learn?utm_source=create-next-app&utm_medium=appdir-template-tw&utm_campaign=create-next-app"
className="group rounded-lg border border-transparent px-5 py-4 transition-colors hover:border-gray-300 hover:bg-gray-100 hover:dark:border-neutral-700 hover:dark:bg-neutral-800 hover:dark:bg-opacity-30"
target="_blank"
rel="noopener noreferrer"
>
<h2 className={`mb-3 text-2xl font-semibold`}>
Learn{' '}
<span className="inline-block transition-transform group-hover:translate-x-1 motion-reduce:transform-none">
->
</span>
</h2>
<p className={`m-0 max-w-[30ch] text-sm opacity-50`}>
Learn about Next.js in an interactive course with quizzes!
</p>
</a>
<a
href="https://vercel.com/templates?framework=next.js&utm_source=create-next-app&utm_medium=appdir-template&utm_campaign=create-next-app"
className="group rounded-lg border border-transparent px-5 py-4 transition-colors hover:border-gray-300 hover:bg-gray-100 hover:dark:border-neutral-700 hover:dark:bg-neutral-800/30"
target="_blank"
rel="noopener noreferrer"
>
<h2 className={`mb-3 text-2xl font-semibold`}>
Templates{' '}
<span className="inline-block transition-transform group-hover:translate-x-1 motion-reduce:transform-none">
->
</span>
</h2>
<p className={`m-0 max-w-[30ch] text-sm opacity-50`}>
Explore the Next.js 13 playground.
</p>
</a>
<a
href="https://vercel.com/new?utm_source=create-next-app&utm_medium=appdir-template&utm_campaign=create-next-app"
className="group rounded-lg border border-transparent px-5 py-4 transition-colors hover:border-gray-300 hover:bg-gray-100 hover:dark:border-neutral-700 hover:dark:bg-neutral-800/30"
target="_blank"
rel="noopener noreferrer"
>
<h2 className={`mb-3 text-2xl font-semibold`}>
Deploy{' '}
<span className="inline-block transition-transform group-hover:translate-x-1 motion-reduce:transform-none">
->
</span>
</h2>
<p className={`m-0 max-w-[30ch] text-sm opacity-50`}>
Instantly deploy your Next.js site to a shareable URL with Vercel.
</p>
</a>
</div>
</main>
)
}
page.tsx file represents the individual page. In the app file, page.tsx represents the home page. Don't worry if you don't understand the code. We will explore each and every line and dissect everyting in grave detail. For now I just don't want to overwhelm you with too much information. In the next blog we will explore why this is named as page.tsx only. Hope to see you there!!


