

Building a Landing Page using TailwindCSS
In this blog, we will build a landing page using all the concepts we have learned till now in the series

Self-taught Developer with over 2 years of experience in developing websites. I want to help clients build websites with technologies like 𝗥𝗲𝗮𝗰𝘁.𝗷𝘀, 𝗡𝗲𝘅𝘁.𝗷𝘀, 𝗮𝗻𝗱 𝗧𝗮𝗶𝗹𝘄𝗶𝗻𝗱𝗖𝗦𝗦 to make their websites fast, and UX-friendly. I also love teaching the things I learn, so I also blog my learnings in a way for people with little knowledge to consume.
Web-Developer: Made over 𝟱+ 𝗽𝗿𝗼𝗷𝗲𝗰𝘁𝘀 on web development with a range of technologies including Reactjs, Nextjs, TailwindCSS, Bootstrap, Redux, ContextAPI, etc.
I believe in Learning by building and so I love applying what I learned to help clients build premium websites with the latest technologies to give their end-users the best experience possible. Additionally, I also love watching anime and playing online video games.
Feel free to connect with me: Email: jhaladevrajsinh11@gmail.com
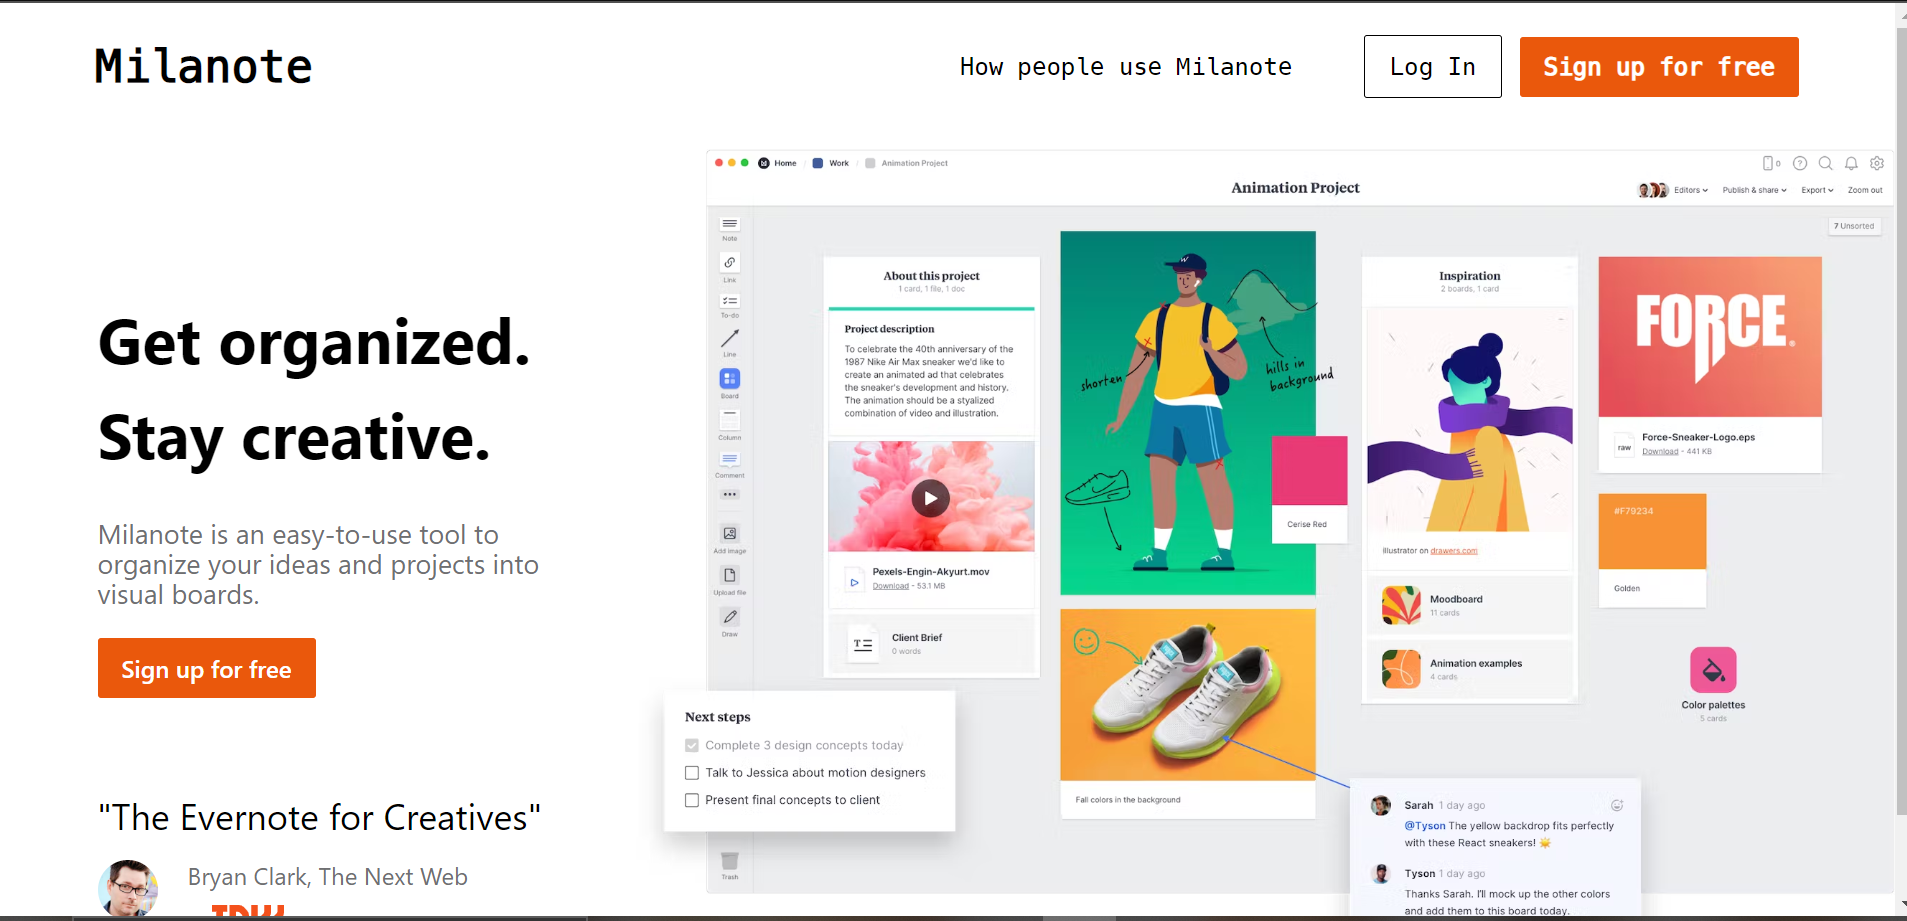
Hello all, Welcome to the last blog of this series where we will be recreating the Milanote Landing Page using TailwindCSS. I have made this project to compile all learnings we have learned till now and make it work. I will be explaining the code below referencing all the previous learnings. Hope you will learn how we are styling, and I advise you to take the code below and make changes to this or build the entire milanote landing page. I have developed just a header only.
Let's start with setting up the project. We will follow the steps we have seen in the 1st Blog of this series. I am using HTML right now, but you can even use React.js, Next.js, Angular.js, etc. You will find installation guides for every framework or library. I am using TailwindCLI for installation:
I created a folder named
tailwind_tutand opened it in Visual Studio Code. You can use the editor of your choice.Then I ran the command
npm init -yto generate a Node.js project.Then I made a
srcfolder and created 2 filesindex.htmlandstyle.cssThen I ran the following commands in the terminal:
npm install -D tailwindcss
npx tailwindcss init
Then in the
tailwind.config.jsfile, I modified the content line to:content: ["./src/**/*.{html,js}"],Then I added the following @tailwind directives to add the classes in our style.css file
@tailwind base;
@tailwind components;
@tailwind utilities;
- Then I ran the following command:
npx tailwindcss -i ./src/style.css -o ./dist/output.css --watch
to compile and watch for the changes in the HTML file and then I clicked on Live Server to generate the web page on the server. Make sure if you have a custom folder instead of src, you replace that name of the folder with src, or if you have a different .css filename replace it with the same.
- Now in the HTML file, I added this link tag to make sure TailwindCSS gets compiled in my HTML file:
<link href="/dist/output.css" rel="stylesheet">
If you will follow these steps, you will have a running Tailwind site ready. If you find any error or styles not getting applied, you can raise the issue in the comments, I will try my best to reply, and also you can refer to the documentation or your best friend Google 😁.
Below you will find the code for the index.html and style.css file. Now I will not explain to you every line of code but the main points like fonts, customization, etc.
`index.html
<!DOCTYPE html>

<html>

  <head>

    <meta charset="UTF-8" />

    <meta name="viewport" content="width=device-width, initial-scale=1.0" />

    <link href="/dist/output.css" rel="stylesheet" />

    <title>Milanote Landing Page</title>

  </head>

  <body>

    <!-- https://milanote.com/ -->

    <nav

      class="flex flex-row font-mono sticky top-0 bg-white items-center justify-between py-5 px-16"

    >

      <p class="font-bold cursor-pointer text-[30px]">Milanote</p>

      <div class="lg:flex hidden flex-row items-center space-x-12">

        <p class="cursor-pointer">How people use Milanote</p>

        <div class="flex flex-row items-center space-x-3">

          <button class="normal-button">Log In</button>

          <button class="orange-button">Sign up for free</button>

        </div>

      </div>

    </nav>


    <section

      class="flex md:flex-row flex-col lg:pl-[50px] overflow-x-hidden mt-3 items-center justify-between"

    >

      <div class="flex flex-col items-start pl-[15px]">

        <div class="pt-[40px] pr-[20px] pb-[25px]">

          <p class="text-[35px] lg:text-[42px] font-bold">Get organized.</p>

          <p class="text-[35px] lg:text-[42px] font-bold">Stay creative.</p>

        </div>


        <p class="text-sm lg:text-[18px] text-[#6f6f72] pb-[20px] pr-[25px]">

          Milanote is an easy-to-use tool to organize your ideas and projects

          into visual boards.

        </p>

        <button class="orange-button">Sign up for free</button>


        <div class="pt-[60px]">

          <p class="text-[18px] lg:text-[24px] mb-[10px]">

            "The Evernote for Creatives"

          </p>

          <div class="flex items-center justify-start space-x-5">

            <img

              src="https://images.prismic.io/milanote/ba790b9b1e2d4a3d184223518d89f25a9e3375be_bryan2x-cc5651bf0374649c6f3e727eb88c588a.png?auto=compress,format"

              alt="Bryan Clark"

              class="h-[40px] w-[40px] rounded-full"

            />


            <div class="text-[#6f6f72]">

              <p class="text-[#6f6f72]">Bryan Clark, The Next Web</p>

              <img

                src="https://images.prismic.io/milanote%2Fad541b50-45e4-477c-bbed-c67d14de3892_the-next-web.svg?auto=compress,format"

                alt="Company Logo"

                class="text-[#6f6f72] mt-2 w-[80px] h-[12px]"

              />

            </div>

          </div>

        </div>

      </div>

      <div class="flex items-center justify-center">

        <img

          src="https://images.prismic.io/milanote/fe89acd7-6881-4ff3-923f-08fff37dfce0_Agency-design-brief-board+example.png?auto=compress%2Cformat&w=1800"

          alt="header"

          class="mt-5 md:mt-0"

        />

      </div>

    </section>

  </body>

</html>
- If you carefully see the code you will see square bracket notation quite frequently, and if you also see the browser dev tools, you will see the custom styles getting applied.
style.css
@tailwind base;

@tailwind components;

@tailwind utilities;


@layer components {

  .orange-button {

    @apply text-white bg-orange-600 font-semibold px-4 py-2 text-center rounded-
    sm;

  }

  .normal-button {

    @apply border border-black px-4 py-2 text-center rounded-sm;

  }

}
- Here you will see the
.orange-button,.normal-buttonclasses as custom classes. @layer components will push these classes after the components classes and apply directive is used to apply these classes to the class. We have used these classes in the navbar and header and as you can see it makes the code a lot cleaner.
And here we are at the end of this series. I hope you have gained some knowledge about TailwindCSS. This is my first series hopefully I fulfilled your expectations and I will be very grateful for your valuable feedback and suggestions. Thank you for your valuable time!


