


Photo by Lautaro Andreani on Unsplash
ContextAPI explained with a detailed example
ContextAPI and its implementation explained with an example and detailed diagrams


ContextAPI:
What is ContextAPI
ContextAPI provides a way to pass data through the component tree without having to pass props down manually at every level.
- Now let's simplify it and understand it together, what the above quote means is that ContextAPI provides a way to access data to any component (states and functions) without having to pass props to them.
- Let's understand it better with a diagram:
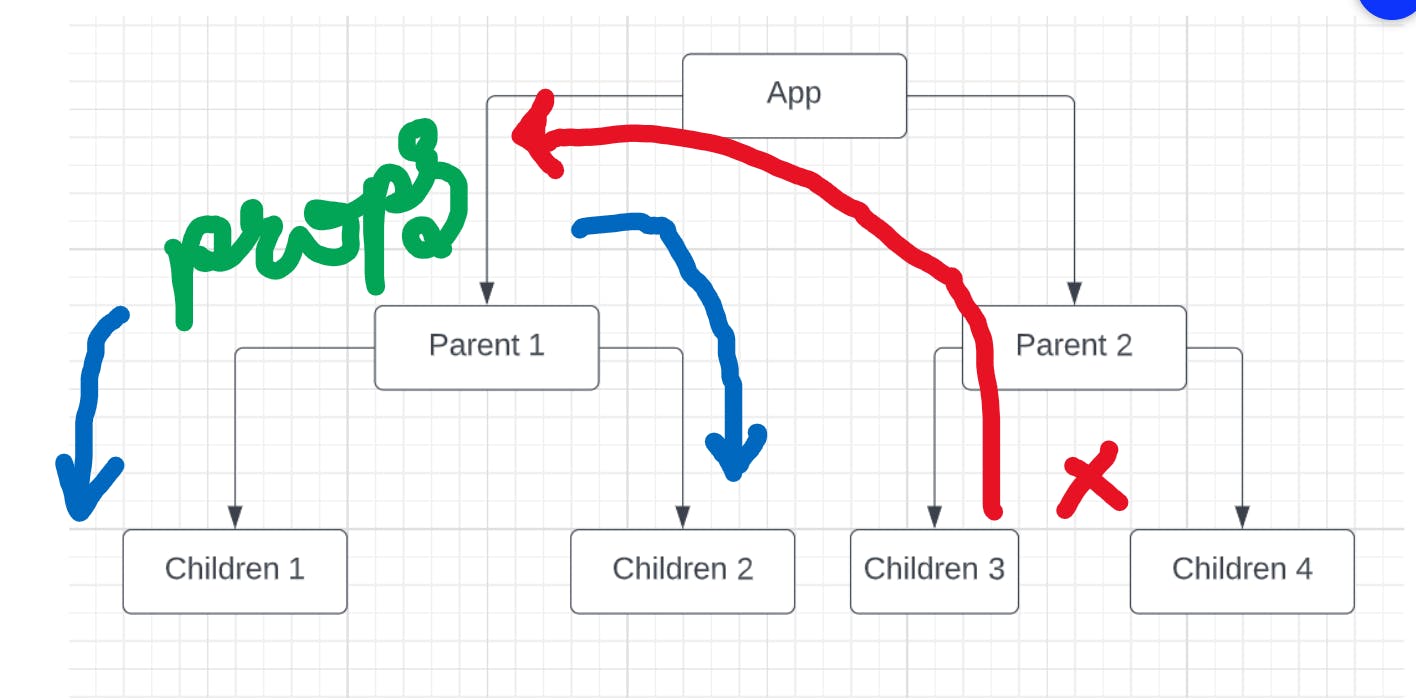
Here consider the above situation where we have a global react component App.js which has two components Parent 1. jsx and Parent 2. jsx and these components further have two components each.
Now if there is an attribute in Parent 1 that we have to access from Children 1, we know the drill, to pass that attribute as props, simple right? Okay but what if the same props must be accessed by Children 3???
Well, one solution is to pass the props onto App and then we can pass the props to Parent 2 and then to Children 3.
- Now as you can see, for just one prop, we are going deeper and deeper into components and this concept is known as Prop Drilling. Now in this example, we have few components but for large-scale projects, Prop Drilling becomes a serious concern.
Why we need ContextAPI
Hence to eliminate prop drilling, we use Context API, let's first see the diagram:
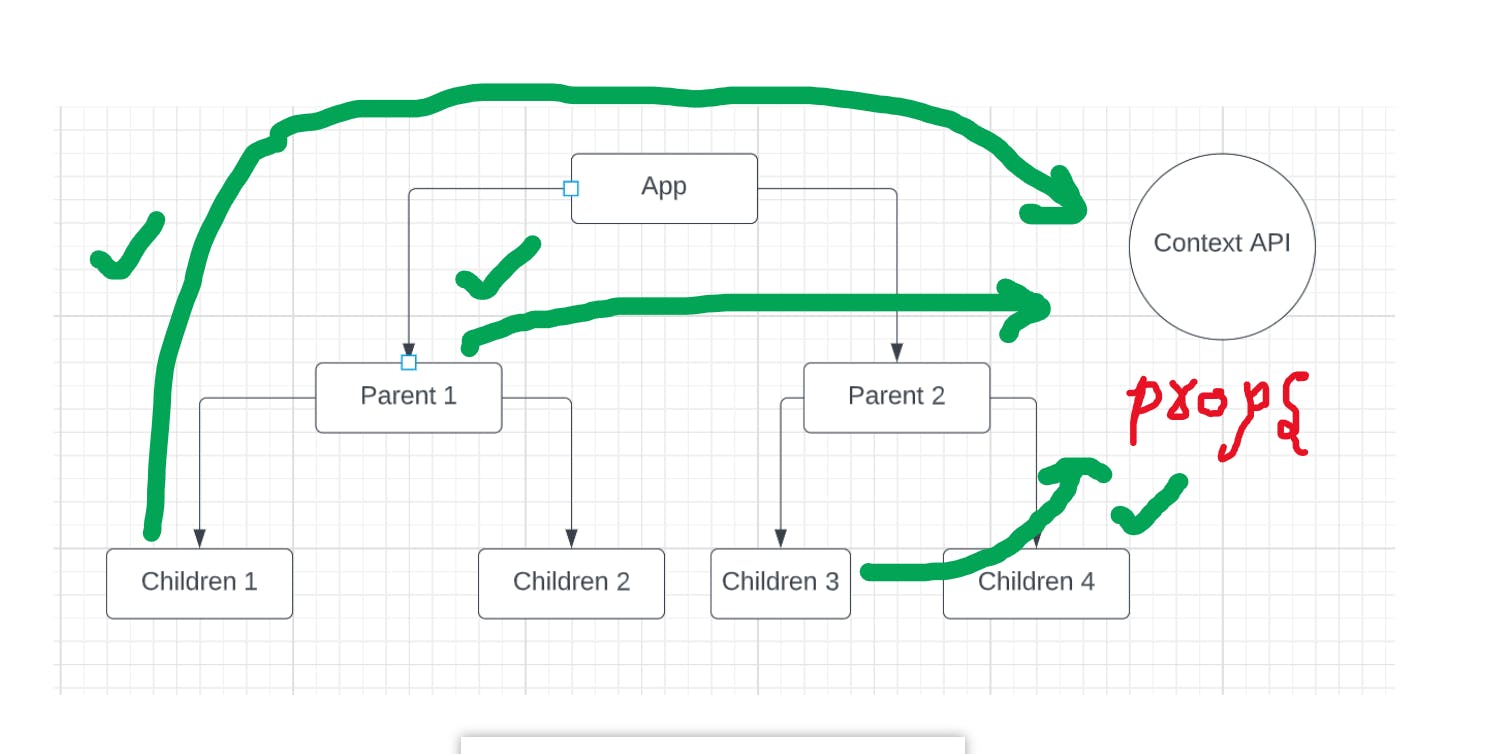
So what ContextAPI does is, it stores all the data and it has access to all the components of the App i.e. Parent and their children. So what happens is any component can directly access the data from ContextAPI only rather than taking it from props.
Hence it manages the data of the entire Application just like Redux!
How to implement ContextAPI:
First, we create a file at a root level, Context.js (You can name it anything of course but it's just a convention). In this Context, we create a context using the createContext hook
export const StateContext = createContext();
Now we wrap our index.js with this StateContext and also all the variables, we initialize are passed to this Context via Context. Provider attribute. Observe the below code for more clarity:
import React, { createContext, useState } from "react";

import App from "./App";

export const multiStepContext = createContext();

const StateContext = () => {

const [currentState, setCurrentState] = useState(1);

const [userData, setUserData] = useState([]);

const [finalData, setFinalData] = useState([]);

// Ignore what the below function does
const submitData = () => {

setFinalData((finalData) => [...finalData, userData]);

setUserData("");

setCurrentState(1);

};

return (

<div>

<multiStepContext.Provider

value={{

currentState,

setCurrentState,

userData,

setUserData,

finalData,

setFinalData,

submitData,

}}

>

<App />

</multiStepContext.Provider>

</div>

);

};

export default StateContext;
import React from "react";

import ReactDOM from "react-dom/client";

import "./index.css";

import App from "./App";

import StateContext from "./StateContext";

const root = ReactDOM.createRoot(document.getElementById("root"));

root.render(

<StateContext>

<React.StrictMode>

<App />

</React.StrictMode>

</StateContext>

);
As you can observe, we have wrapped the App.js component inside Context. Provider attribute and now we have passed all the states and functions (data) to the context via Context. Provider and we have wrapped the root component in the context in index.js (second code block).
And that's it our Context is now up and running! Now let's see how components can use them:
import React, { useContext } from "react";
import { multiStepContext } from "../StateContext";

const { setCurrentState, userData, setUserData } = useContext(multiStepContext);
// Destructuring data so that components can use it
As we can see, any component can use the data via a hook called useContext, the data can be passed raw or destructured by passing the name of context as an argument in useContext.
And that's it, hope you have learned something new today, another method is using useReducer hook but that would be too long for this blog. Let me know in the comments if you want a separate blog on the useReducer hook
Thank you for reading and giving your valuable time!